Windows February 24, 2024
Efficiently Clear and Reset External Display Cache in Windows 10

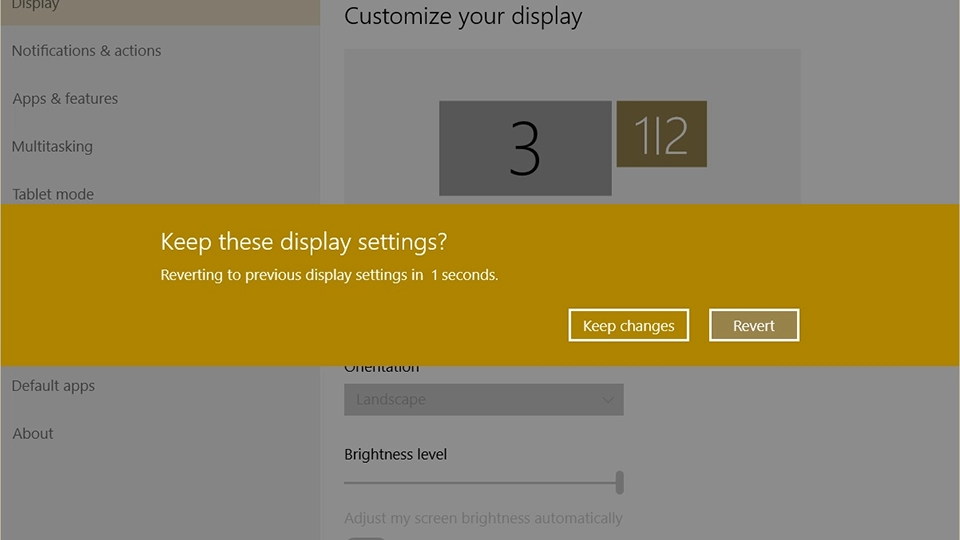
Mastering the intricacies of managing external displays in Windows 10 can significantly enhance your multitasking capabilities and streamline your workflow. The Project feature, nestled within the operating system, empowers users to seamlessly toggle between display modes, ensuring optimal productivity. Here's a comprehensive guide on how to navigate and reset the external display cache in Windows 10 for uninterrupted performance:
Understanding Windows 10 Project Modes
Windows 10 Project feature offers a spectrum of display modes tailored to suit diverse user preferences:
-
PC screen only: Solely activates the primary display, rendering all other connected displays inactive, a feature particularly handy when utilizing a wireless projector.
-
Duplicate: Mirrors the primary display onto the secondary screen, ideal for presentations or collaborative work scenarios.
-
Extend: Expands your desktop across all connected monitors, maximizing screen real estate and fostering multitasking efficiency.
-
Second screen only: Deactivates the primary display, seamlessly transitioning to the external display for dedicated usage.
The versatility of these modes allows users to tailor their display configurations to suit specific tasks and environments, enhancing overall user experience and productivity.

The Significance of Display Cache
Windows 10 meticulously stores display configurations in a cache within the Registry, ensuring swift and seamless recall of preferred settings upon reconnecting external monitors. This feature eliminates the need for repetitive configuration adjustments, facilitating a seamless transition between different display environments.
Clearing and Resetting the Display Cache
In the event of display inconsistencies or malfunctions stemming from a corrupted cache, resetting the display cache becomes imperative to restore optimal functionality. Follow these steps to clear and reset the display cache in Windows 10:
Access Administrative Account: Ensure that you are logged in with administrative privileges to execute system-level commands effectively.
Open the Registry Editor app: Access the Registry Editor tool in Windows 10. (Press 'Windows Key + R' to open the Run dialog box, then type 'regedit' and hit Enter to launch the Registry Editor.)
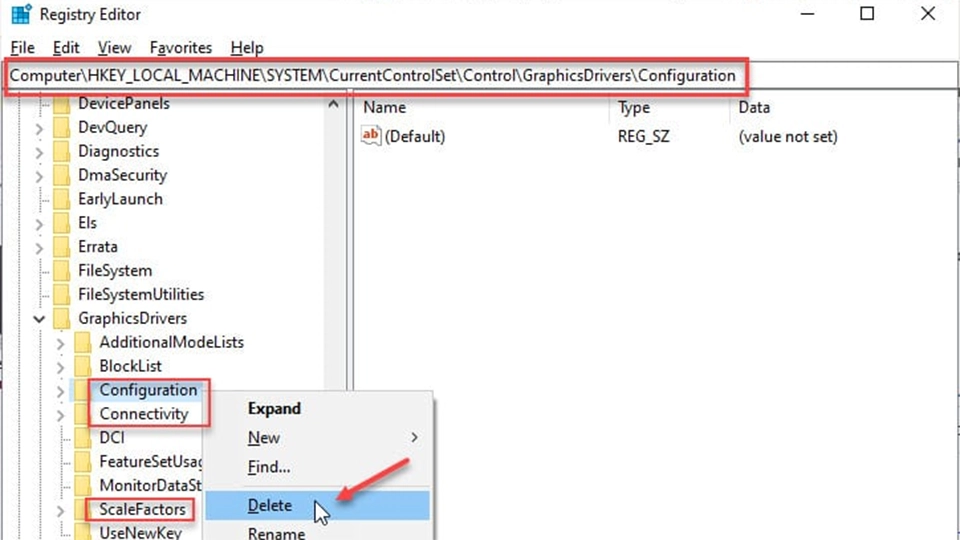
Locate Display Cache Settings: Within the Registry Editor interface, navigate to the following path:
HKEY_LOCAL_MACHINE\SYSTEM\CurrentControlSet\Control\GraphicsDrivers\
You can directly navigate to this key by following the given path.

Delete specific subkeys:
- Right-click on the subkey named "Configuration" within the GraphicsDrivers key.
- Select "Delete" from the context menu to remove this subkey.
- Additionally, delete two other subkeys named "Connectivity" and "ScaleFactors" from the same location.
Restart Windows 10: After deleting the specified subkeys, restart your Windows 10 system to apply the changes made by the Registry tweak.
Completion: Once Windows restarts, the external display cache should be cleared and reset.
Alternatively, to simplify the process and save time, you can download a ready-to-use Registry file provided. This file enables you to clear and reset the display cache with just a few clicks, eliminating the need for manual Registry editing.
By following these steps, you should be able to effectively clear and reset the external display cache in Windows 10, ensuring optimal performance and functionality of connected external monitors or projectors.
Efficient management of external display configurations is paramount for optimizing productivity and ensuring seamless user experience in Windows 10 environments. Understanding the intricacies of display modes and the significance of the display cache empowers users to troubleshoot and maintain optimal performance levels. By following these steps to clear and reset the display cache, users can mitigate potential display-related issues and enjoy uninterrupted productivity across various display setups.
For further insights and troubleshooting assistance regarding Windows 10 display management, consult reputable technical resources or community forums dedicated to Windows operating systems.
Stay tuned to UserPulseHub for more insightful guides and tips on maximizing your Windows 10 experience and enhancing overall digital productivity.
Share
Latest article
- HBO Pulls the Plug on ‘The Franchise’ After Just One Season
- OnePlus’s New Flagship Killer: The OnePlus 13R Revealed!
- OpenAI’s Latest Move: ChatGPT’s Web Search Engine Goes Live
- Life is Strange: Double Exposure Review – Max Caulfield’s Triumphant Return
- Astro Bot: The Game That Makes Owning a PS5 Worth It
Categories
- AI
- AR-VR Headsets
- Baby
- Cloud Storages
- Earbuds & Headphones
- Games
- Gaming Laptops
- Others
- GPUs
- Leaks
- Mobile
- Windows
Topics
Apple Apple Vision Apple Vision Pro Apps AR AR-VR Astro Bot Asus ROG audio baby monitors baby monitor comparison baby monitor reviews baby monitors Babysense MaxView review best baby monitor features best baby monitors Black Myth: Wukong Bluetooth Cache Reset ChatGPT Cloud Cloud Storage contact us Cookie Policy Cross-Platform Drive EA Entertainment External Display Face ID Family Share Fold 5 Fold 6 Foldable Phones Galaxy A35 Galaxy A55 Galaxy Z Fold Game Reviews Games Gaming Gaming Laptop Google Google Drive Google Mobile Phones Google One Google Pixel Google Pixel 9 GPU GPU Review HBO Headphones high-definition baby monitors Honor Honor Magic V2 iPhone Leaks Life is Strange Life is Strange: Double Exposure local video baby monitors long battery life baby monitors Microsoft Microsoft Windows Mobile Mobile Phones Mobile Reviews Multi Connection Multipoint Nanit Pro baby monitor NVIDIA NVIDIA RTX 4070 OnePlus OpenAI Optic ID Phones Privacy Policy Productivity Project Rene PS5 Games Registry Editor Release Date Reviews RPG Games Rumors Samsung Samsung Z Fold Sea Of Thieves SearchGPT secure baby monitors Storage Spaca Strategy Games Strategy RPG Summer Gaming Marathon Tech News The Sims 5 Top 10 Apps top baby monitors Troubleshooting TV Series Unicorn Overlord video baby monitors VR VR Headsets VTech baby monitors Wi-Fi baby monitors Windows Windows 10 Windows 11 Windows 11 24H2 Windows 12 Windows Guides Z Fold 5 Zephyrus G14Related Posts

User Pulse Hub
